I am taking a week-long photography course at the school at the International Center of Photography. It is located right in the center of our lovely city - can't complain about a day spent in Manhattan!
Today we learned about the meat and potatoes of photography. I mean, I have read about these things over and over and over and over - and not understood them. But my wonderful instructor broke them down and explained them in a mere three hours, and I saw the light. Literally. (We actually learned a lot more than that - and I am still trying to digest it all - I took many pages of notes!)
So here is the situation. It is all about the light. And most importantly about three settings in your camera.
ISO
Aperture
Shutter Speed
Now, apparently, why I did not seem like such a bad photographer with my point-and-shoot is that your point and shoot meters the light and makes all these settings for you, as it thinks they should be. Sometimes it's right, and sometimes it's wrong. But you don't even know what's happening. Well, I didn't know what was happening. That's for sure!!!
So, long story, short. When I switched to the SLR, and shunned the basic modes. I was literally up a creek without a paddle.
So here is what I learned. And it's a learning exercise for me to be writing about this, so I can begin to cement it in my brain, and have it become second nature. Hopefully, sometime in the future.
ISO: How sensitive your camera's sensor is to light.
Aperture: The size of the opening in the lens, that allows light to pass through to the sensor
Shutter Speed: How fast the shutter opens and closes to let light strike the sensor
HELLO! There are three ways to affect the amount of light that comes into your camera.
(yelling at myself, not you wonderful folks!)
Check this bad-boy out:
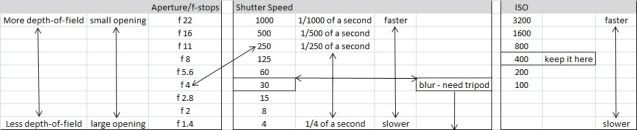
If it hard to see, here is the link:
http://i305.photobucket.com/albums/nn224/brusselea/Misc/lighting.jpg
Lots of good info in this chart. And most of it is self-explanatory. EXCEPT for the pointy, diagonal line going between aperture and shutter speed. I promise you, this is good. All the reading I did, never once mentioned this relationship and how it moves together.
Here it is:
If you adjust either the aperture OR the shutter speed, up or down, the corresponding setting on the other side of the see-saw must swing the OPPOSITE direction in the SAME number of stops!
The above numbers are an example of what the camera could meter the light in the room as. It's the starting point.
f 4 / 250
If you decide you want a greater depth of field (using this example), you will move the aperture UP to f 5.6 AND the shutter speed DOWN to 125.
Voila. Now why couldn't I figure that out by myself????
Now that we have that down, I will share some of the pictures that I took as class assignments. The first set of pictures is a study in aperture and depth-of-field and the second set is a study in shutter speed.
They are not brilliant, but they get the job done.
Aperture Priority (AV on my Canon Rebel T1i) Notice how the depth-of-field becomes larger in each photo. For a good reference point, check out the giraffe print purse at the top of the photo, and the lines on the sidewalk. As the aperture closes, more of the photo comes into focus.
(and if you are interested in the faux burberry/etienne aigner/coach/purple snakeskin/hotpink handle bag in the foreground, it can be your for the 42nd street special price of $20.00 - I will be happy to forward it to you)
Aperture: 1.8
Shutter Speed: 1/250
ISO: 400

Aperture: 3.4
Shutter Speed: 1/100
ISO: 400
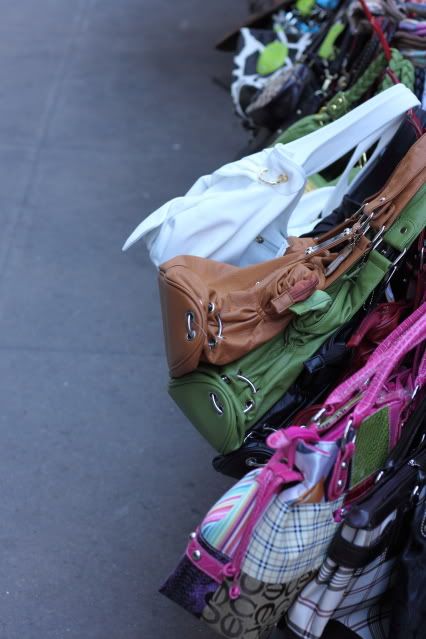
Aperture: 8.0
Shutter Sped: 1/13
ISO: 400
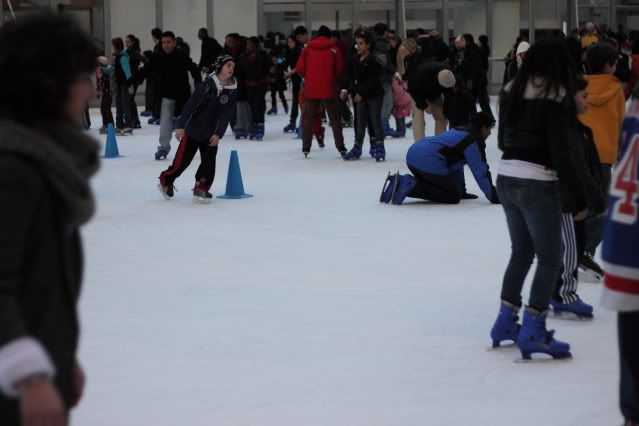
Now, these two are a study in shutter speed. In the first photo, I had a fast shutter speed to catch the ice skaters, without them blurring. In the second photo, I had a very slow shutter speed, and that is what caused the blurring of the cars. In order for the photo to stay in focus, I had to rest my camera on a garbage can, and use a two second delayed shutter, so that the camera did not shake. So whatever was not moving, is in focus.
A garbage can??? I think I need a tri-pod!!!!
Aperture: 2.2
Shutter Speed: 1/2500
ISO: 400
Aperture: 22
Shutter Speed: 1/4
ISO: 400

Phew! So that is what I learned today. I am quite excited to practice this, and learn what's coming up tomorrow!!!
xoxoxo
Umm Nidal
+of+Copy+(1)+of+IMG_0524.JPG)
Wow! Thanks for this Umm Nidal. I've learnt a lot from your post! I hope you're enjoying your course. I'm looking forward to more!!! ;)
ReplyDeletexxx
i am so glad the course is fruitful for you....i can't wait to see your shots from now on! Looks like you are learning a lot already.
ReplyDeletemasha'allah!!...i'm so glad you're enjoying yourself...I can just feel the enthusiasm bubbling away!!
ReplyDeletelooking forward to seeing more too insha'allah
xxx
wow, i'm very impressed sis...all this learning in a matter of hour, well done. I don't think I would have digested it all...looking forward to more pics , thanks for sharing...
ReplyDeletema'sha allah - that is soooooo cool! I am very happy for you Cindi! :) Your pics are amazing.
ReplyDelete